We would like to share our experience of integrating Sitecore 9.3 with the Azure AD B2C (Azure Active Directory Business to Consumer) user management system.

Dmitry Bastron
Solution Architect / Kentico MVP
Sitecore CMS is a prominent content management system built on the .NET Framework. According to Built With, over 17,000 websites have been developed using Sitecore, including those of Microsoft, United Airlines, PUMA, L'Oreal, and others. Sitecore is a key component of our technology stack. In collaboration with our partners UNRVLD (formerly Delete Agency), we have developed sites on Sitecore for various companies and brands such as Biffa, Leeds Beckett University, The Open, Southampton FC, Royal Canin, and many more.
Azure Active Directory B2C is a cloud-based customer identity access management service that enables users to sign in to applications using social media, enterprise, and local accounts.
For one of our projects, we faced the task of creating a personalized account for clients of a large organization. All users of this account should have the ability to view current transactions, generate invoices for payments, communicate with technical support, manage personal information, etc. Additionally, all data within the personal account needed to be fetched securely from our customer's corporate system via an API. Azure Active Directory B2C was chosen as the user entry point by the customer.
Let's take a closer look at the challenges we encountered and the solutions we developed:
We encountered several difficulties during this process, including:
While the internet offers extensive documentation, articles, and guides on Sitecore CMS and Azure Active Directory B2C, we were unable to find solutions tailored to our specific problems and challenges consolidated into a single article. Consequently, we had to address these issues ourselves and occasionally sought assistance from Sitecore's official technical support. In this article, we will share the knowledge gained from our experiences.
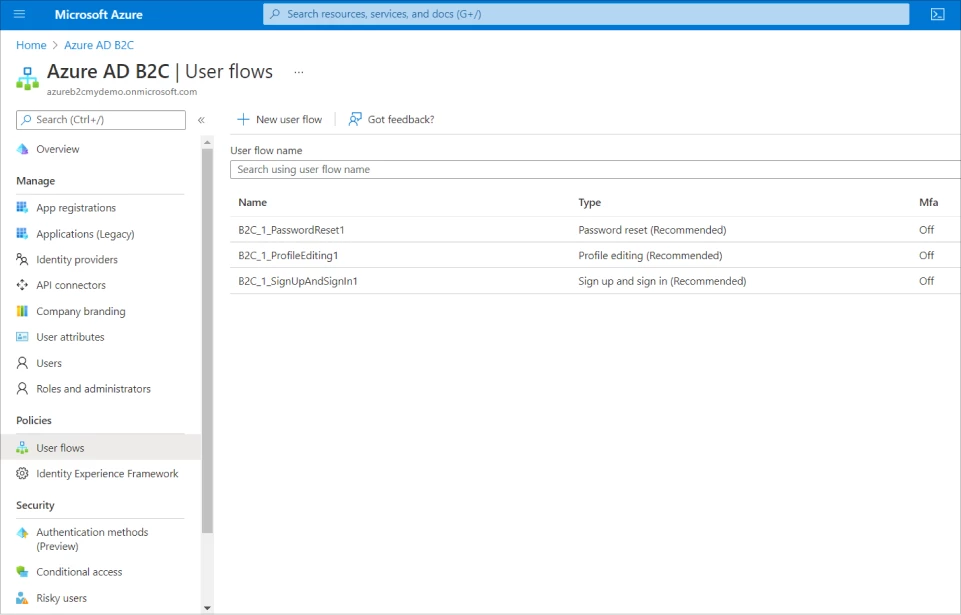
To replicate our Sitecore integration with Azure AD B2C, we need to establish a basic Azure AD B2C client. This client should include standard sign-up, sign-in, and password reset user flows. Follow the official guide, replicating steps 1 to 3, to create a functioning client with the desired user flow configurations.
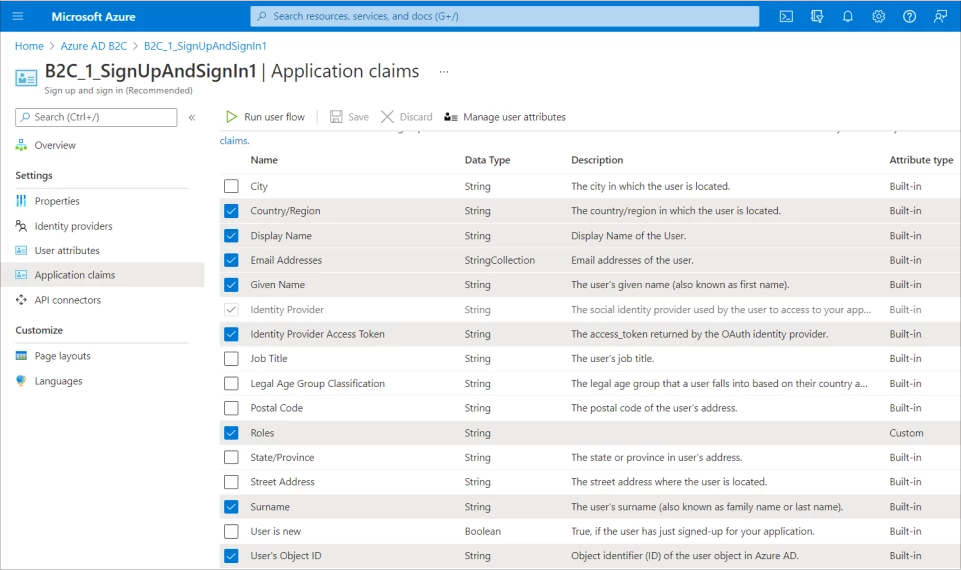
We must also select the Сlaims to be included in the ID token. In addition to standard claims like name and email, we'll add a "Roles" claim. To do this, click on Manage user attributes → Add. This will allow us to assign roles such as administrator, client, or guest when creating a user. Keep in mind that in a real application, this would require configuring individual user policies. However, the approach described above is sufficient for demonstration purposes.
Subsequently, when users log in or register, they will receive an ID token containing information about their roles and other details.
{
  "typ": "JWT",
  "alg": "RS256",
  "kid": "X5eXk4xyojNFum1kl2Ytv8dlNP4-c57dO6QGTVBwaNk"
}.{
  "exp": 1646850084,
  "nbf": 1646846484,
  "ver": "1.0",
  "iss": "https://azureb2cmydemo.b2clogin.com/d227dc46-1f9c-4a46-97a2-d3b83ed89a3a/v2.0/",
  "sub": "b5bb6799-77f9-43a6-b6bf-15eaff761600",
  "aud": "d1400d7d-a389-4c38-a36f-327e8e949017",
  "nonce": "defaultNonce",
  "iat": 1646846484,
  "auth_time": 1646846484,
  "oid": "b5bb6799-77f9-43a6-b6bf-15eaff761600",
  "name": "Test user",
  "country": "US",
  "given_name": "John",
  "family_name": "Smith",
  "extension_Roles": "Administrator, Developer",
  "emails": [
    "useremail@gmail.com"
  ],
  "tfp": "B2C_1_SignUpAndSignIn1"
}.[Signature]
The final step for setting up an Azure B2C client involves integrating it with a secure API. Follow the setup process outlined in step 2 of the guide. Consequently, our web application will gain access to a secure API, which will be utilized to obtain Access and Refresh tokens.

According to the official documentation, federated authentication requires specific configuration settings for Sitecore. Additionally, considering our project's requirements, we needed to establish a password reset pipeline and implement the retrieval of Access and Refresh tokens. The following aspects needed implementation:
Moreover, we need to address cookie management, the logout process, and session termination.
During the Sitecore setup and integration with Azure AD B2C, we reached significant conclusions:
For Identity Provider configuration, the following steps are required:
Below is the code for the class implementing the pipeline for user registration and login:
namespace SitecoreAzureB2CDemo.Pipelines
{
public class SignUpAndSignInPipeline : IdentityProvidersProcessor
{
private readonly string _tenant = "azureb2cmydemo.onmicrosoft.com";
private readonly string _aadInstance;
private readonly string _metaAddress;
private readonly string _redirectUri = "https://sitecoreazureb2cdemosc.dev.local/azureb2c";
private readonly string _postLogoutRedirectUri = "https://sitecoreazureb2cdemosc.dev.local/azureb2c";
private readonly string _clientId = "xxx"/>;
private readonly string _clientSecret = "xxx"/>;
private readonly string _scope = "https://azureb2cmydemo.onmicrosoft.com/tasks-api/tasks.read";
protected override string IdentityProviderName => IdentityProviderNames.SignUpAndSignIn;
protected virtual string Policy => "B2C_1_SignUpAndSignIn1";
private readonly HttpClient _client = new HttpClient();
private IdentityProvider IdentityProvider => GetIdentityProvider();
public SignUpAndSignInPipeline(FederatedAuthenticationConfiguration federatedAuthenticationConfiguration,
ICookieManager cookieManager, BaseSettings settings) : base(federatedAuthenticationConfiguration,
cookieManager, settings)
{
var aadInstanceTemplate = "https://azureb2cmydemo.b2clogin.com/{0}/{1}";
_aadInstance = string.Format(aadInstanceTemplate, _tenant, Policy);
_metaAddress = $"{_aadInstance}/v2.0/.well-known/openid-configuration";
}
protected override void ProcessCore(IdentityProvidersArgs args)
{
Assert.ArgumentNotNull(args, nameof(args));
var authenticationType = GetAuthenticationType();
var options = new OpenIdConnectAuthenticationOptions(authenticationType)
{
Caption = IdentityProvider.Caption,
AuthenticationMode = AuthenticationMode.Passive,
RedirectUri = _redirectUri,
PostLogoutRedirectUri = _postLogoutRedirectUri,
ClientId = _clientId,
Authority = _aadInstance,
MetadataAddress = _metaAddress,
UseTokenLifetime = true,
TokenValidationParameters = new TokenValidationParameters { NameClaimType = Claims.Name },
CookieManager = CookieManager,
Notifications = new OpenIdConnectAuthenticationNotifications
{
RedirectToIdentityProvider = OnRedirectToIdentityProvider,
SecurityTokenValidated = OnSecurityTokenValidated,
}
};
args.App.UseOpenIdConnectAuthentication(options);
}
private async Task OnSecurityTokenValidated(
SecurityTokenValidatedNotification<OpenIdConnectMessage, OpenIdConnectAuthenticationOptions> arg)
{
var identity = arg.AuthenticationTicket.Identity;
identity.AddClaim(new Claim(Claims.IdToken, arg.ProtocolMessage.IdToken));
//apply Sitecore claims tranformations
arg.AuthenticationTicket.Identity.ApplyClaimsTransformations(
new TransformationContext(FederatedAuthenticationConfiguration, IdentityProvider));
arg.AuthenticationTicket = new AuthenticationTicket(identity, arg.AuthenticationTicket.Properties);
}
private Task OnRedirectToIdentityProvider(
RedirectToIdentityProviderNotification<OpenIdConnectMessage, OpenIdConnectAuthenticationOptions> arg)
{
var owinContext = arg.OwinContext;
var protocolMessage = arg.ProtocolMessage;
if (protocolMessage.RequestType == OpenIdConnectRequestType.Authentication)
{
protocolMessage.Prompt = "login";
}
else if (protocolMessage.RequestType == OpenIdConnectRequestType.Logout)
{
protocolMessage.PostLogoutRedirectUri = BuildPostLogoutRedirectUri(owinContext);
}
return Task.CompletedTask;
}
}
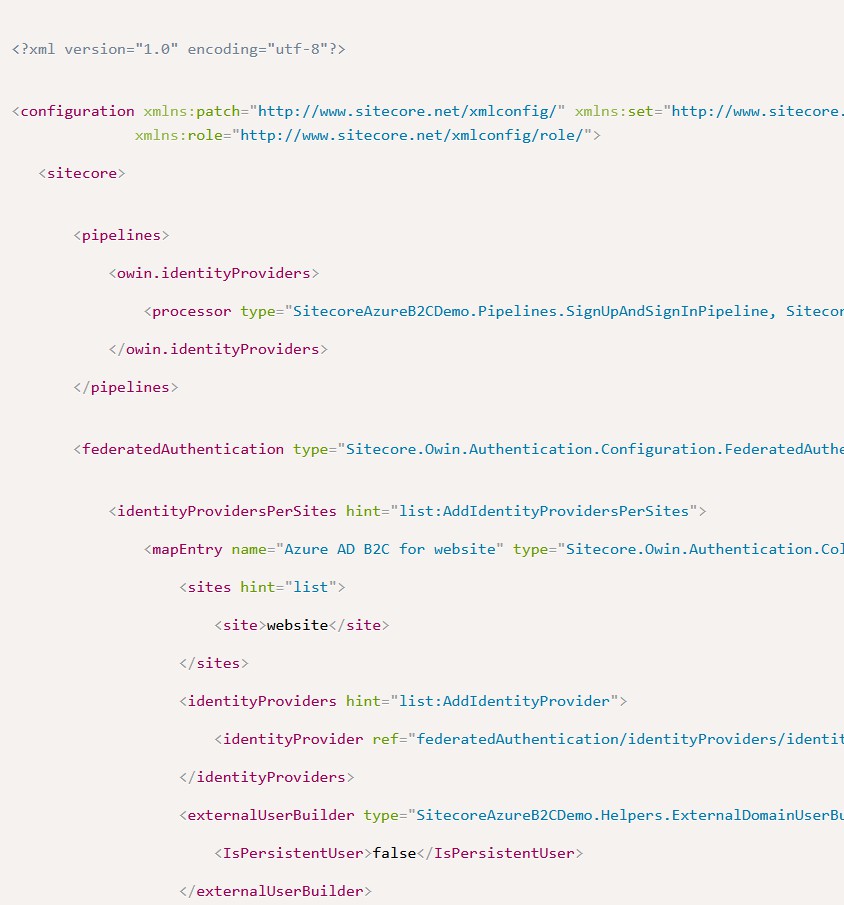
}To incorporate this pipeline into the Sitecore configuration, follow these steps:
The resulting Sitecore configuration patch file should resemble this:

Place the Azure B2C configuration settings within the appSettings section of the Web.config file:
<appSettings configBuilders="SitecoreAppSettingsBuilder">
   <add key="AzureB2C.Tenant" value="azureb2cmydemo.onmicrosoft.com"/>
   <add key="AzureB2C.SignUpAndSignInPolicy" value="B2C_1_SignUpAndSignIn1"/>
   <add key="AzureB2C.PasswordResetPolicy" value="B2C_1_PasswordReset1"/>
   <add key="AzureB2C.ProfileEditingPolicy" value="B2C_1_ProfileEditing1"/>
   <add key="AzureB2C.ClientId" value="xxx"/>
   <add key="AzureB2C.ClientSecret" value="xxx"/>
   <add key="AzureB2C.RedirectUri" value="https://sitecoreazureb2cdemosc.dev.local/azureb2c"/>
   <add key="AzureB2C.PostLogoutRedirectUri" value="https://sitecoreazureb2cdemosc.dev.local/azureb2c"/>
   <add key="AzureB2C.AzureADInstance" value="https://azureb2cmydemo.b2clogin.com/{0}/{1}"/>
   <add key="AzureB2C.AccessTokenUri" value="https://azureb2cmydemo.b2clogin.com/azureb2cmydemo.onmicrosoft.com/{0}/oauth2/v2.0/token"/>
   <add key="AzureB2C.Scope" value="https://azureb2cmydemo.onmicrosoft.com/tasks-api/tasks.read" />
 </appSettings>
Additionally, the following points deserve attention:
To retrieve Access and Refresh tokens, the information provided to the user within the personal account is fetched from the secure API on the client side. These tokens are required to communicate with the API securely.
We achieve the acquisition of tokens for accessing the secure API within the event handler that handles the successful validation of the security token received from Azure B2C (OnSecurityTokenValidated). Subsequently, the received tokens need to be stored in claims, making them accessible throughout the project.
For the sake of clarity, we opted for a conventional API request without relying on third-party libraries. In a genuine project scenario, it's recommended to create a dedicated service to track token lifetimes and manage updates as necessary. Alternatively, you can utilize a third-party library that facilitates token validation and updates.
A comprehensive guide detailing the process of obtaining tokens can be found in the "Requesting an Access Token in Azure Active Directory B2C" section of the official Microsoft documentation.
private async Task OnSecurityTokenValidated(
   SecurityTokenValidatedNotification<OpenIdConnectMessage, OpenIdConnectAuthenticationOptions> arg)
{
   var identity = arg.AuthenticationTicket.Identity;

   var result = await GetToken(arg.ProtocolMessage.Code);

   identity.AddClaim(new Claim(Claims.IdToken, arg.ProtocolMessage.IdToken));
   identity.AddClaim(new Claim(Claims.AccessToken, result.AccessToken));
   identity.AddClaim(new Claim(Claims.RefreshToken, result.RefreshToken));

   //apply Sitecore claims tranformations
   arg.AuthenticationTicket.Identity.ApplyClaimsTransformations(
       new TransformationContext(FederatedAuthenticationConfiguration, IdentityProvider));
   arg.AuthenticationTicket = new AuthenticationTicket(identity, arg.AuthenticationTicket.Properties);
}

private async Task GetToken(string code)
{
   var getTokenUrl = string.Format(AzureB2CConfiguration.AccessTokenUri, Policy);

   var dict = new Dictionary<string, string>
   {
       { "grant_type", "authorization_code" },
       { "client_id", _clientId },
       { "client_secret", _clientSecret },
       { "scope",  $"{_scope}  offline_access" },
       { "code",  code },
       { "redirect_uri",  AzureB2CConfiguration.RedirectUri},
   };
   var requestBody = new FormUrlEncodedContent(dict);
   var response = await _client.PostAsync(getTokenUrl, requestBody);
   response.EnsureSuccessStatusCode();

   var  responseBody = await response.Content.ReadAsStringAsync();
   var responseDto = JsonConvert.DeserializeObject(responseBody);
   return responseDto;
}Depending on various work scenarios, there may arise a need to transform (or map) certain claims into others or into Sitecore user properties. Sitecore provides a built-in mechanism to facilitate these transformations. For more detailed insights, refer to the "Configure Federated Authentication" section in the official documentation.
Transformations can be configured in two ways:
Consequently, you can define shared transformations applicable to all providers within a single sharedTransformations section, and specific transformations can be established for individual providers as needed.
Let's examine a few examples:
<sharedTransformations>
   <transformation type="Sitecore.Owin.Authentication.Services.DefaultTransformation, Sitecore.Owin.Authentication">
       <sources hint="raw:AddSource">
           <claim name="emails" />
       </sources>
       <targets hint="raw:AddTarget">
           <claim name="email" />
       </targets>
       <keepSource>false</keepSource>
   </transformation>
</sharedTransformations><sharedTransformations>
<transformation name="map roles from Sitecore"
type="SitecoreAzureB2CDemo.Transformations.ClaimsToRolesTransformation, SitecoreAzureB2CDemo"
patch:after="transformation[@type='Sitecore.Owin.Authentication.IdentityServer.Transformations.ApplyAdditionalClaims, Sitecore.Owin.Authentication.IdentityServer']"
resolve="true" />
</sharedTransformations>To accomplish this, we developed a class inheriting from the Transformation class and implemented the required logic within it.
public class ClaimsToRolesTransformation : Transformation
{
   public override void Transform(ClaimsIdentity identity, TransformationContext context)
   {
       var claimValue = identity.Claims.GetClaimValue(Claims.Permissions);

       if (string.IsNullOrEmpty(claimValue))
       {
           return;
       }

       var userPermissions = claimValue.Split(',');
       foreach (var userPermission in userPermissions)
       {
           identity.AddClaim(new Claim(Claims.Role, userPermission));
       }
   }
}
Additionally, here's an example of mapping claims to profile properties stored within the user's profile.
<propertyInitializer
   type="Sitecore.Owin.Authentication.Services.PropertyInitializer, Sitecore.Owin.Authentication">
   <maps hint="list">
       <map name="emailClaim"
            type="Sitecore.Owin.Authentication.Services.DefaultClaimToPropertyMapper, Sitecore.Owin.Authentication"
            resolve="true">
           <data hint="raw:AddData">
               <source name="email" />
               <target name="Email" />
           </data>
       </map>
</propertyInitializer>When dealing with federated authentication, a decision needs to be made whether to utilize a virtual user for the session's duration or to establish a persistent user. Since user management in our system is entirely delegated to the client's system, we opted for the virtual user option.
Initially, let's create a class that inherits from DefaultExternalUserBuilder. Generating a username is one of its primary tasks.
public class ExternalDomainUserBuilder : DefaultExternalUserBuilder
   {
       public ExternalDomainUserBuilder(ApplicationUserFactory applicationUserFactory, IHashEncryption hashEncryption)
           : base(applicationUserFactory, hashEncryption)
       {
       }

       public override ApplicationUser BuildUser(UserManager userManager,
           ExternalLoginInfo externalLoginInfo)
       {
           var appUser = base.BuildUser(userManager, externalLoginInfo);

           appUser.InnerUser.Profile.Save();

           return appUser;
       }

       private static void MapClaimToCustomProperty(ExternalLoginInfo source, ApplicationUser target, string claim, string propertyName)
       {
           var property = source.GetClaimValue(claim);

           if (!string.IsNullOrEmpty(property))
           {
               target.InnerUser.Profile.SetCustomProperty(propertyName, property);
           }
       }

       protected override string CreateUniqueUserName(UserManager userManager,
           ExternalLoginInfo externalLoginInfo)
       {
           if (userManager == null)
           {
               throw new ArgumentNullException(nameof(userManager));
           }

           if (externalLoginInfo == null)
           {
               throw new ArgumentNullException(nameof(externalLoginInfo));
           }

           var identityProvider =
               this.FederatedAuthenticationConfiguration.GetIdentityProvider(externalLoginInfo.ExternalIdentity);

           if (identityProvider == null)
           {
               throw new InvalidOperationException("Unable to retrieve identity provider for given identity");
           }

           var domain = identityProvider.Domain;

           var name = externalLoginInfo.GetClaimValue(Claims.Email);

           if (string.IsNullOrEmpty(name))
           {
               return GetDomainUserName(domain, externalLoginInfo.DefaultUserName);
           }

           return GetDomainUserName(domain, name.Replace(",", ""));
       }

       private string GetDomainUserName(string domain, string userName)
       {
           Sitecore.Diagnostics.Log.Info("Azure login user " + userName, this);
           return $"{domain}\\{userName}";
       }
   }
Subsequently, we must register this class within the Sitecore configuration. To achieve this, introduce an externalUserBuilder section within federatedAuthentication → identityProvidersPerSites → mapEntry. In this context, the IsPersistentUser property for virtual users should be set to false.
<externalUserBuilder
   type="SitecoreAzureB2CDemo.Helpers.ExternalDomainUserBuilder, SitecoreAzureB2CDemo" resolve="true">
   <IsPersistentUser>false</IsPersistentUser>
</externalUserBuilder>Upon configuring one or more external identity providers, links to access them can be generated by invoking the Sitecore GetSignInUrlInfo pipeline. This pipeline will yield a collection of login links, one for each identity provider. The desired link can be selected based on the provider's name.
private string GetSignInUrl(string identityProviderName, string returnUrl)
{
   if (string.IsNullOrEmpty(identityProviderName))
   {
       throw new ArgumentNullException(nameof(identityProviderName));
   }

   var pipelineManager = (BaseCorePipelineManager)ServiceLocator.ServiceProvider.GetService(typeof(BaseCorePipelineManager));
   var args = new Sitecore.Pipelines.GetSignInUrlInfo.GetSignInUrlInfoArgs(Sitecore.Context.Site.Name, returnUrl);
   Sitecore.Pipelines.GetSignInUrlInfo.GetSignInUrlInfoPipeline.Run(pipelineManager, args);

   var url = args.Result.FirstOrDefault(x => x.IdentityProvider == identityProviderName);

   return url?.Href;
}
It's important to note that the generated link does not direct to Azure AD B2C directly but instead leads to the Sitecore Identity Server:
/identity/externallogin?authenticationType=SignUpAndSignIn&ReturnUrl=%2fidentity%2fexternallogincallback%3fReturnUrl%3d%252fazureb2c%26sc_site%3dwebsite%26authenticationSource%3dDefault&sc_site=website
To engage with the identity server, a POST request needs to be dispatched. An XHR request isn't suitable in this context as a 302 redirect to Azure AD B2C is expected in response.
This is where the auto-submit form proves beneficial:
<html>
<body onload='sessionStorage.clear(); document.forms[""form""].submit()'>
<form name='form' action='@Model.SignInUrl' method='post'>
   <input type="submit" value="Login">
</form>
</body>
</html>
Examining the code above reveals that the form contains a JavaScript snippet that executes automatically once the HTML loading is completed.
Subsequently, the identity server redirects us to Azure AD B2C, incorporating the necessary parameters for internal processing.
Recalling the recommendation from Sitecore's technical support, separate Identity Provider classes are advised for each Azure B2C flow/policy. Consequently, an additional Identity Provider is required for password reset purposes.
To achieve this, a new pipeline that inherits from SignUpAndSignInPipeline is created:
public class PasswordResetPipeline : SignUpAndSignInPipeline
{
   public PasswordResetPipeline(FederatedAuthenticationConfiguration federatedAuthenticationConfiguration,
       ICookieManager cookieManager, BaseSettings settings) : base(federatedAuthenticationConfiguration,
       cookieManager, settings)
   {
   }

   protected override string IdentityProviderName => IdentityProviderNames.PasswordReset;
   protected override string Policy => "B2C_1_PasswordReset1";
}
Subsequently, this pipeline needs to be registered in the configuration, mirroring the steps outlined earlier in the "Identity Provider Configuration" section for SignUpAndSignInPipeline.
<pipelines>
   <owin.identityProviders>
       <processor type="SitecoreAzureB2CDemo.Pipelines.SignUpAndSignInPipeline, SitecoreAzureB2CDemo" resolve="true" />
       <processor type="SitecoreAzureB2CDemo.Pipelines.PasswordResetPipeline, SitecoreAzureB2CDemo" resolve="true" />
   </owin.identityProviders>
</pipelines>

<federatedAuthentication
   type="Sitecore.Owin.Authentication.Configuration.FederatedAuthenticationConfiguration, Sitecore.Owin.Authentication">

   <identityProvidersPerSites hint="list:AddIdentityProvidersPerSites">
       <mapEntry name="Azure AD B2C for website"
                 type="Sitecore.Owin.Authentication.Collections.IdentityProvidersPerSitesMapEntry, Sitecore.Owin.Authentication" resolve="true">
           <sites hint="list">
               <site>website</site>
           </sites>
           <identityProviders hint="list:AddIdentityProvider">
               <identityProvider ref="federatedAuthentication/identityProviders/identityProvider[@id='SignUpAndSignIn']" />
               <identityProvider ref="federatedAuthentication/identityProviders/identityProvider[@id='PasswordReset']" />
           </identityProviders>
           <externalUserBuilder
               type="SitecoreAzureB2CDemo.Helpers.ExternalDomainUserBuilder, SitecoreAzureB2CDemo" resolve="true">
               <IsPersistentUser>false</IsPersistentUser>
           </externalUserBuilder>
       </mapEntry>
   </identityProvidersPerSites>

   <identityProviders hint="list:AddIdentityProvider">
       <identityProvider id="SignUpAndSignIn" type="Sitecore.Owin.Authentication.Configuration.DefaultIdentityProvider, Sitecore.Owin.Authentication">
           <param desc="name">SignUpAndSignIn</param>
           <param desc="domainManager" type="Sitecore.Abstractions.BaseDomainManager" resolve="true" />
           <caption>SignUpAndSignIn</caption>
           <domain>extranet</domain>
           <enabled>true</enabled>
           <triggerExternalSignOut>true</triggerExternalSignOut>
           <transformations hint="list:AddTransformation">
           </transformations>
       </identityProvider>
       <identityProvider id="PasswordReset" type="Sitecore.Owin.Authentication.Configuration.DefaultIdentityProvider, Sitecore.Owin.Authentication">
           <param desc="name">PasswordReset</param>
           <param desc="domainManager" type="Sitecore.Abstractions.BaseDomainManager" resolve="true" />
           <caption>PasswordReset</caption>
           <domain>extranet</domain>
           <enabled>true</enabled>
           <triggerExternalSignOut>true</triggerExternalSignOut>
           <transformations hint="list:AddTransformation">
           </transformations>
       </identityProvider>
   </identityProviders>
This approach enables us to work with multiple custom policies. When invoking the GetSignInUrlInfoPipeline, a collection of links is obtained, and the desired Identity Provider can be selected based on its name.
private string GetSignInUrl(string identityProviderName, string returnUrl)
        {
            if (string.IsNullOrEmpty(identityProviderName))
            {
                throw new ArgumentNullException(nameof(identityProviderName));
            }

            var pipelineManager = (BaseCorePipelineManager)ServiceLocator.ServiceProvider.GetService(typeof(BaseCorePipelineManager));
            var args = new Sitecore.Pipelines.GetSignInUrlInfo.GetSignInUrlInfoArgs(Sitecore.Context.Site.Name, returnUrl);
            Sitecore.Pipelines.GetSignInUrlInfo.GetSignInUrlInfoPipeline.Run(pipelineManager, args);

            var url = args.Result.FirstOrDefault(x => x.IdentityProvider == identityProviderName);

            return url?.Href;
}Let's take a look at the results of our efforts. We began by attempting to log in. Initially, we navigated to the test page where we observed that "Is Authenticated" was set to false. This indicates that we didn't have an authenticated user yet; no claims were present, and the user profile properties remained unfilled.

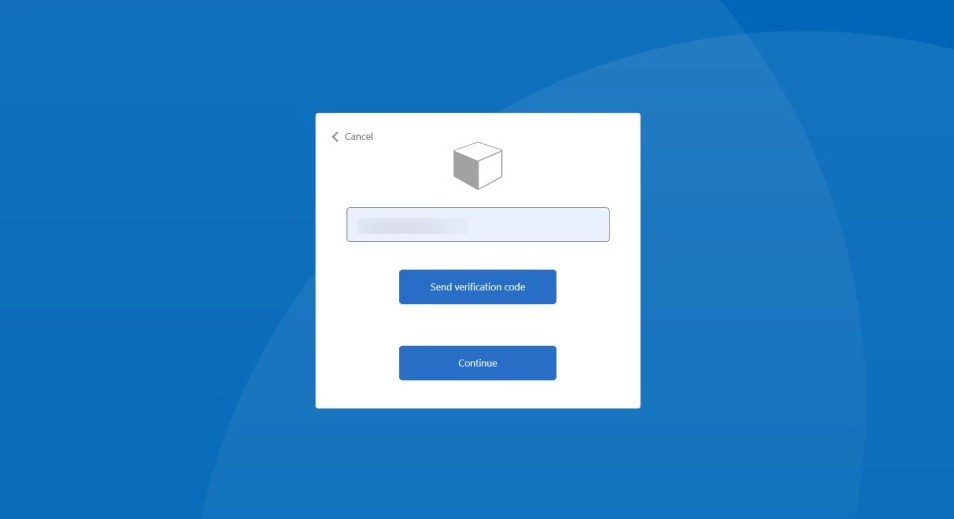
Upon clicking the "Login" button, the browser directed us to the Azure AD B2C login page.
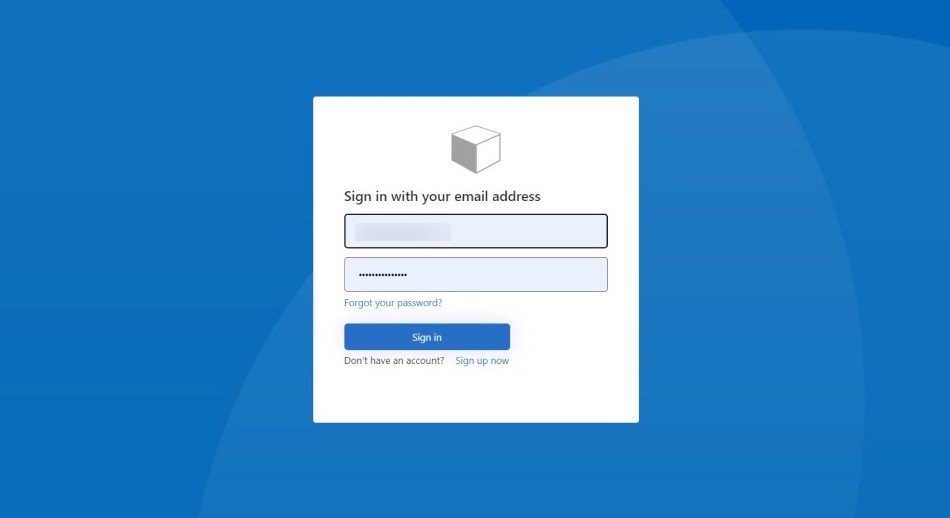
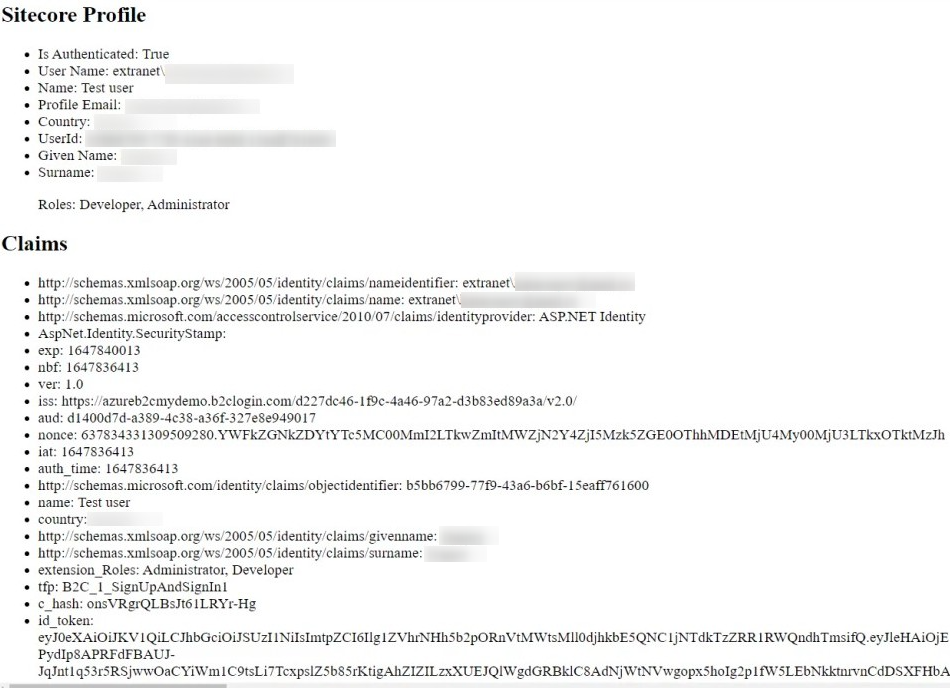
After entering our login credentials and clicking the "Sign in" button, we were returned to our application's test page. As depicted in the image below, the authentication process was successful. The user was authorized, and we could see the completed profile properties, claims, and assigned roles.
To ensure the effectiveness of the password reset functionality, we clicked on the "Password reset" button, which led us to the password reset page.

And there you have it! We've accomplished all the necessary tasks, and everything is functioning as expected. We have seamlessly implemented the login and logout processes for personal accounts on Sitecore via Azure AD B2C. In addition, we've gained a solid understanding of how to manage various user policies. We've empowered users with the capability to reset and modify their passwords, all while ensuring meticulous cookie management.
We'd like to emphasize the invaluable assistance provided by Sitecore's official technical support. They played a significant role in guiding us toward solutions for specific challenges we encountered during this task. Their support was instrumental in resolving issues such as the endless redirect during logout and the utilization of separate identity providers for distinct user policies. We are grateful for their readiness to aid developers in overcoming obstacles and ensuring successful project implementation!

Dmitry Bastron
We will take you on a journey through a real-life scenario of implementing advanced tracking and analytics using Kentico Xperience 13 DXP.
Dmitry Bastron
We'll dive into practical implementation in your Xperience by Kentico project. We'll guide you through setting up a custom activity type and show you how to log visitor activities effectively.

Anastasia Medvedeva
Kentico stands as one of our principal development tools, we believe it would be fitting to address why we opt to work with Kentico and why we allocate substantial time to cultivating our experts in this DXP.
Chrome DevTools serves as a developer console, offering an array of in-browser tools for constructing and debugging websites and applications.

Anna Gevel
As a software development company, we at Byteminds truly believe that learning and sharing knowledge is one of the best ways of growing technical expertise.
Anastasia Medvedeva
Our expertise spans full-scale builds and support to upgrades and replatforming.
Anastasia Medvedeva
Since 2015, we've been harnessing Kentico's capabilities well beyond its core CMS functions.
Anastasia Medvedeva
Our team boasts several developers experienced in working with Umbraco, specialising in development, upgrading, and replatforming from other CMS to Umbraco.

Sergei Pestov
How to stop declining of the performance indicators of your ecommerce website and perform optimising page load performance.
Anna Gevel
We've collected various findings around decision models and programmable nodes working with Sitecore Personalize.
We will explain how these agreements differ from one another and what projects they are suitable for.
Let's talk about what enterprise development is, what nuance enterprise projects may have, and which skills you need to acquire to successfully work within the .NET stack.

Andrey Stepanov
All you need to know about Headless CMS. We also share the knowledge about benefits of Headless CMS, its pros and cons.
We'll consider the top-to-bottom approach for modeling content relationships, as it is more user-friendly for content editors working in the Kontent.ai admin interface.
Anna Gevel
One of the first things I tested in Sitecore XM Cloud was embedded tracking and personalisation capabilities. It has been really interesting to see what is available out-of-the-box, how much flexibility XM Cloud offers to marketing teams and what is required from developers to set it up.